The “Lintels” plugin allows you to automatically place metal and reinforced concrete lintels on selected doors, windows, openings and stained glass windows, make an automatic specification of both the lintels themselves and their parts, as well as make a list of lintels with images according to State Standard.
1. Setting up the plugin
Since the plugin implies in its work and filling in certain parameters, you need to set them up. Go to the plugin settings


Here we go to the "Lintels" tab and select a certain parameter in each block.
1. If you don't know or don't want to fill it in, you can just click on the "Fill in the recommended BimStep parameters" checkbox, and then the plugin will set everything up by itself.
2. Text parameter for the "Generalized Models" category by instance, which will be responsible for the position.
3. Text parameter for the category "Generalized models" by instance, which will be responsible for the name.
4. Text parameter for the category "Generalized Models" by the instance that will be responsible for the denomination.
5. A parameter with the data type "Length" for the category "Generalized Models" by instance, which will be responsible for the length of lintels and their components.
6. A parameter with the data type "Number" for the category "Generalized Models" on the instance to which the plugin will record the mass of the jumper and its components.

7. A text parameter for the "Generalized Models" category by instance, which will be responsible for the units of measurement.
8. Text parameter for the "Generalized models" category by instance, which will be responsible for filtering elements by specifications.
9. The text parameter of data type "Number" for the category "Generalized models" for example, which will be responsible for the indicator of the number of specification elements.
10. The text parameter for the "Generalized models" category by instance, which will be responsible for grouping the jumper parts according to the jumper brand.
2. Plugin algorithm
Below there is a schematic representation of the plugin's algorithm for setting lintels in a project

3. Positioning of metal lintels
Launch the lintel positioning plugin

Then you need to select the door or window opening on which you want to place the lintel.
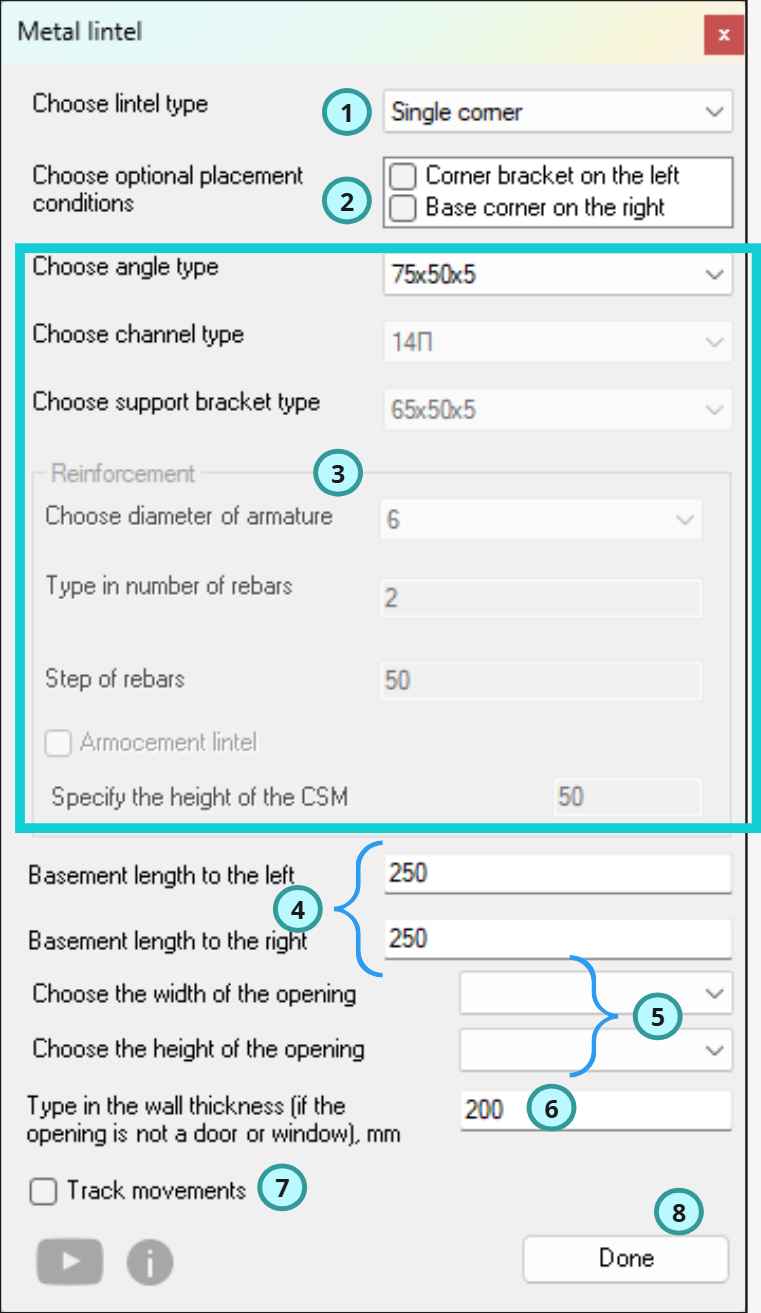
Then you will see a window where you need to make the following settings:
Select the type of metal lintel you need (rebar, single angle, two angles with lintels, two angles without lintels, channel, two channels with plates) from all the proposed options
2. If you have an opening adjoining, for example, to the left or right side of the reinforced concrete and you additionally need a supporting corner, check the box.
3. Further, depending on what type of lintel you have chosen - specify its profile according to the assortment. I.e. if you have chosen channel, then specify what kind of channel the plugin needs to use in the family, in the case of selecting rebar - what diameter and how many reinforcing bars should be used in the work, etc.
4. Specify the left and right support lengths for the lintel. I.e. the distance it will go into the wall.
5. Since in revit all families can be created differently by each author - not always the parameters Width and Height are responsible for the actual size of the width and height of the opening, so you will need to specify parameters that accurately define in the door family its opening, so that the lintel gets the real size.
6. In case you want your lintel to be a different thickness than the wall thickness, specify this value in the field.
7. We check the box if you need the lintel to move after the opening.
8. Click Done!
The plugin will install a lintel over the opening

This way you can arrange metal lintels around your door and window openings.
4. Creating schedules for lintels
So, we have arranged all the lintels families. Now it's time to make the schedule. Of course, you can make your own schedule or with the help of a BIM specialist, but you can also specify both lintels and parts with the help of a plugin.
On the BS_AR tab, click on the "Lintels Specs" button


In the opened window you need to:
1. Specify a name for the new specification for jumpers or jumper parts.
2. Check the checkbox if you want the plugin to sort the jumper parts in the specification by the brand of the main jumper. In this case, the plugin uses the grouping parameter specified in the settings. It is into this parameter that the value of the brand of the main jumper family will be translated.
3. If you need to make a specification for only 1 level, you can specify this here and select the level.
4. Create a specification for the jumpers or their parts.5. Button for mass conversion. For example, if you have changed something manually in the jumper parameters after installing the jumper with the plugin. The jumper does not recalculate its total mass automatically and therefore you need to click on this button.
6. Button for updating the family of metal jumper from the server.
This results in the following schedules:
1. Schedule of jumpers

2. Lintels details schedule


Comments